Admin Console Overview
This chapter covers what a system administrator needs to know upon first logging into the solution. Detailed feature operations are covered in subsequent chapters.
Access
The admin console is not reached via a direct URL. Click the Admin Center button — one of the two mode-switch buttons (Agent Workspace / Admin Center) at the top-left of the solution — to enter the admin area.
- Log in with an account that has administrator privileges
- From the top-left mode-switch buttons (Agent Workspace / Admin Center), click Admin Center
- You land on the Admin Control Center overview, which presents the responsibilities, primary menus, and operations guide in three steps (STEP 1–3)
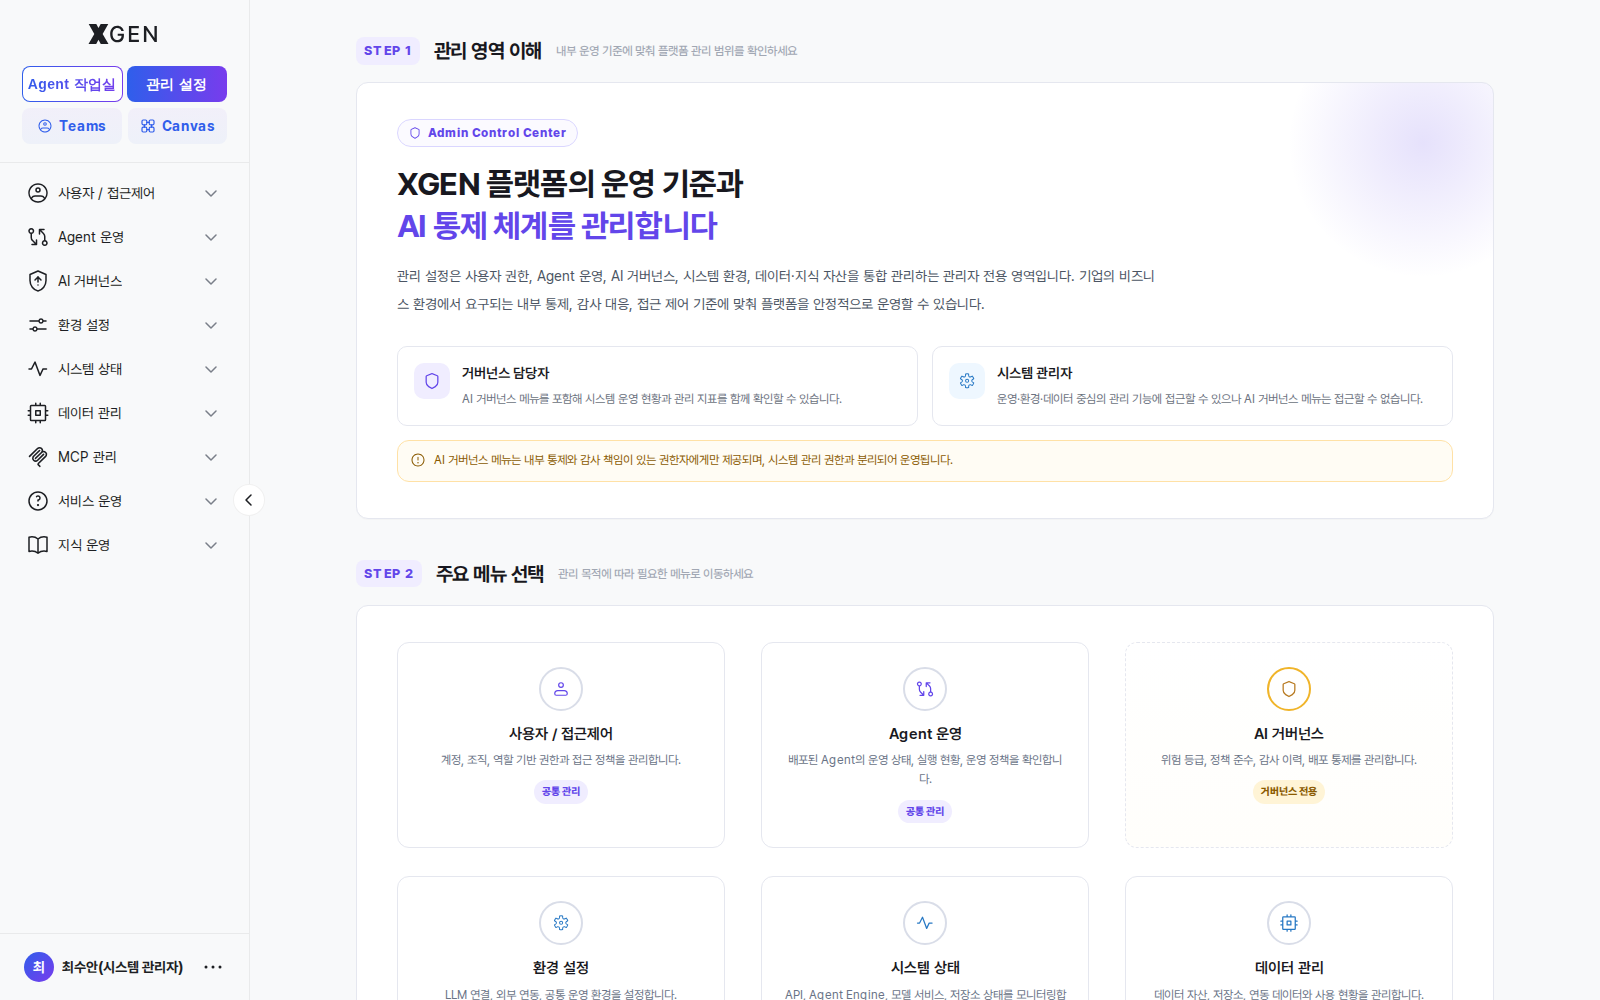
The main column is organized into three steps:
| Step | Content |
|---|---|
| STEP 1 — Understanding Admin Areas | Explains the split between "Governance Officer" and "System Administrator" responsibilities. AI Governance is governed by a separate permission system and is intentionally decoupled from general system administration. |
| STEP 2 — Pick a Main Menu | Exposes the 9 admin areas (Users / Access Control, Agent Operations, AI Governance, Environment, System Status, Data Management, MCP Management, Service Operations, Knowledge Operations) as cards. Clicking a card opens that area's default screen. |
| STEP 3 — Operations Guide | Quick links to the operations recipes: first-time checklist, daily operations, system-security review, and AI governance policy operation. |
See the Admin Console Layout table below for the full menu breakdown.
SuperUser Privileges Required
Admin Center is the SuperUser-only area that integrates user permissions, agent operations, AI governance, system environment, and data/knowledge assets.
SuperUser is further split into two roles on top of the same permission tier. Even within the same SuperUser tier, the sidebar menu scope varies depending on which role is assigned.
| Role | Access Scope |
|---|---|
| Governance Officer | Can view the AI Governance menu along with system operations status and management metrics. Granted only to those with internal control / audit responsibility. |
| System Administrator | Has access to operations, environment, and data administration menus, but cannot access the AI Governance menu. |
The AI Governance menu is provided only to those with internal control and audit responsibility, and is operated separately from system administration privileges. This separation lets the platform run reliably under enterprise requirements for internal control, audit response, and access governance.
Permission Tiers
The solution uses a two-tier permission model. Role definition / assignment and ABAC permission grants are covered in the Role / Permission Management chapter.
| Tier | Korean | What they can do |
|---|---|---|
| Standard User | 일반 사용자 | Encompasses two Agent Workspace user types (Standard User / Agent Developer). Standard Users use Chat / Technical Support / Dashboard only; Agent Developers receive additional menu permissions for Agent Creation / Tool Integration / Knowledge Management |
| SuperUser | 슈퍼유저 | Manage users/roles, configure system, run AI governance, monitor operations, delegate permissions, reset the system |
- Even a Standard User account may receive additional individual admin-menu permissions if a SuperUser grants them per operational policy.
New users are created as Standard User by default. Granting SuperUser privilege is allowed only to an existing SuperUser. Keep at least one SuperUser for the system, ideally on a separate account isolated from daily operations.
Admin Console Layout
The Admin sidebar has 9 groups and 36 menus in total (some may be hidden depending on permissions). Menu labels match the live solution screen. The mapping from each menu to its manual chapter is below.
| Group | Menu | Manual Chapter |
|---|---|---|
| Users / Access Control | User Management | User Management · User List & Approval |
| Users / Access Control | Role / Permission | Role / Permission · Permission Model / Roles |
| Users / Access Control | Login Management | Login Management |
| Agent Operations | Agent Management | Agent Operations · Agent Management (Deployment Approval) |
| Agent Operations | Chat Monitoring | Agent Operations · Chat Monitoring |
| Agent Operations | User Tokens | Agent Operations · User Tokens |
| Agent Operations | Node Management | Agent Node List |
| Agent Operations | Prompt Templates | Agent Operations · Prompt Templates |
| Agent Operations | User Feedback | Agent Operations · User Feedback |
| Agent Operations | Response Quality Evaluation | Agent Operations · Response Quality Evaluation |
| Agent Operations | Agent Retention Analysis | Agent Operations · Retention Analysis |
| Agent Operations | Task Planning | Agent Operations · Task Planning |
| AI Governance | AI Risk Assessment | AI Governance · Risk Review |
| AI Governance | Inspection History | AI Governance · Inspection |
| AI Governance | Service Change History | AI Governance · AI Service Change History |
| AI Governance | Control Policy Management | AI Governance · Control Policy, PII Policy |
| Environment | General | All Settings |
| Environment | LLM | LLM Settings |
| Environment | Infrastructure | Infrastructure · Environment Overview |
| Environment | Search / Embedding | Embedding Settings |
| Environment | Audio | Audio · Environment Overview |
| Environment | Guardrail | Guardrail Model Setup |
| Environment | Sidebar | Sidebar · Environment Overview |
| System Status | System Monitoring | System Monitor · System Monitoring |
| System Status | System Inspection | System Monitor · System Inspection |
| System Status | Log Viewer | System Monitor · Log Viewer |
| Data Management | Database | Data Management · Database |
| Data Management | DB Connection | Data Management · DB Connection |
| Data Management | Batch Jobs | Data Management · Batch Jobs |
| Data Management | Data Audit Log | Data Management · Data Audit Log |
| MCP Management | MCP Library | MCP Library · MCP Library |
| MCP Management | MCP Operations & Monitoring | MCP Library · MCP Operations / Monitoring |
| Service Operations | Announcement Board | Tech Support Handling · Announcement Board |
| Service Operations | FAQ | Tech Support Handling · FAQ |
| Service Operations | 1:1 Admin Inquiry | Tech Support Handling · 1:1 Admin Inquiry |
| Knowledge Operations | Collection Management | Knowledge Operations · Collection Management |
Environment Overview — Menus Without a Dedicated Chapter
Four Environment menus — General / Infrastructure / Audio / Sidebar — do not have a dedicated chapter in this manual. Each screen is one-time installation- or tenant-level setup, so the quickest path is to operate them directly on the solution screen.
| Menu | Where to enter | Screen role |
|---|---|---|
| General | Admin → Environment → General (admin?view=admin-system-config) |
A unified, advanced view that lets you read/edit every system configuration value from a single screen. Day-to-day operations should rely on the individual menus (LLM / Search / Embedding / Guardrail); this screen is the key-value precision-edit entry point. (See General screen in detail below.) |
| Infrastructure | Admin → Environment → Infrastructure | API server, Agent engine, model-serving endpoints and infrastructure parameters. Typically configured once at install time. |
| Audio | Admin → Environment → Audio | STT/TTS voice-model integration. Only meaningful when voice features are enabled. |
| Sidebar | Admin → Environment → Sidebar | Toggle visibility of individual sidebar menus per organization, used to hide selected menus from users. |
Dedicated chapters are planned as follow-up work; until then, use the entry paths above to inspect or change these settings directly on the solution screen.
General screen in detail
The General screen (admin?view=admin-system-config) exposes every environment variable the solution uses on a single page. The page header reads "General — Inspect and edit every system configuration value." The body has three areas:
- Three top stat cards — total settings / configured (different from default) / still on default. Example: Total 191 / Configured 67 / Default 124 (numbers vary by environment).
- Category tabs — left to right All / Node / Workflow / Application / Vector DB / OpenAI / Gemini / Anthropic / AWS / Vision·Language each showing its count (the number next to the tab label). Categories may grow with the environment; the tab strip is horizontally scrollable.
- Setting cards — within each category, keys are listed as cards. Each card shows:
- Key + dotted path — e.g.,
IS_AVAILABLE_TTSwithtts.is_available_tts - Current value / Default side by side. Cards carry a Default badge when the two match, or a Configured badge when they differ.
- Type badge —
Bool/Json/Str/Int, etc.
- Key + dotted path — e.g.,
Verify impact before editing
General exposes keys that directly affect LLM / Embedding / TTS / Node / Workflow behavior. The same keys are editable from individual menus (LLM / Search·Embedding / Guardrail), so keep a consistent record of which screen a change was made from. Invalid values affect in-flight chats and executions immediately — coordinate with the operations team before changes.
Menu Naming
Menu names on screen may vary slightly between solution versions and user permissions. This manual is based on Xgen stage / 2.3.0; bolded menus are those this manual covers.
First-Run Checklist
Items the operations team should verify first after deploying the solution to a new environment. Detailed configuration steps for each item are in the related chapters.
Connect an LLM provider
Choose an LLM provider matching your operational policy and register its connection details.
Examples:
- OpenAI
- Anthropic
- On-premise vLLM
- Other on-premise inference servers
Confirm that the required API key, endpoint, and model information are registered correctly.
Connect an embedding model and vector DB
The Knowledge Retrieval (RAG) feature requires both an embedding model and a vector DB connection.
Examples:
- Register the embedding model
- Configure vector DB connection details
- Verify index creation
A pre-check for connection errors is recommended.
Review PII policy
Review the personal-information / sensitive-information protection policy.
- Confirm the items targeted for automatic masking
- Review the sensitive-information detection policy
- Confirm any organization-specific additional policy
For finance-sector or high-security environments, registering additional regex-based detection rules is recommended.
Define roles and assign user permissions
Define roles aligned with your operational policy and assign permissions to users.
Examples:
- Standard User
- Analyst
- Operator
- Agent Developer
- Administrator
Grant only the permissions actually required, following the least-privilege principle.
Set system monitoring thresholds
Configure thresholds for system health monitoring.
Examples:
- CPU utilization
- Memory utilization
- Disk usage
- GPU utilization
Verify that alerts are dispatched correctly when thresholds are exceeded.
Confirm audit log retention policy
Confirm that the retention period for audit logs and execution history meets internal policy and relevant regulations.
Examples:
- User activity logs
- Execution history
- Administrator change history
- Security audit logs
※ Finance-sector environments typically apply long-term retention policies (e.g., 5 years or more).
Operating Principles
Baseline operational principles to follow when using the admin console.
Verify impact scope before any change
System configuration changes can immediately affect the entire user environment. In particular, changes to LLM, embedding model, or vector DB settings may impact ongoing chats, Agent execution results, and Knowledge Retrieval quality, so review before applying.
Operate from the audit log
All administrator actions are recorded in the audit log. Periodically review the history of key actions — configuration changes, permission updates, deployment approvals, etc.
Apply least-privilege
Grant users only the minimum permissions required for their work. When temporary privilege elevation is required, revoke it immediately after the task is completed.
Back up before bulk changes
Before bulk-changing collections, prompts, policies, or system settings, back up the current state using the Export feature. Maintain a recoverable state whenever you modify the production environment.
Contact
For questions about administrator features, please contact the Xgen Solution Administrator.