User Management
This chapter covers procedures for approving, modifying, and deactivating system user accounts. New users are added through the user-side self-signup flow → Pending-Approval queue → SuperUser approval. The "+ Add User" button (admin directly creating an account) is not exposed on the current solution build.
User List
Select Admin → Users / Access Control → User Management in the left sidebar.
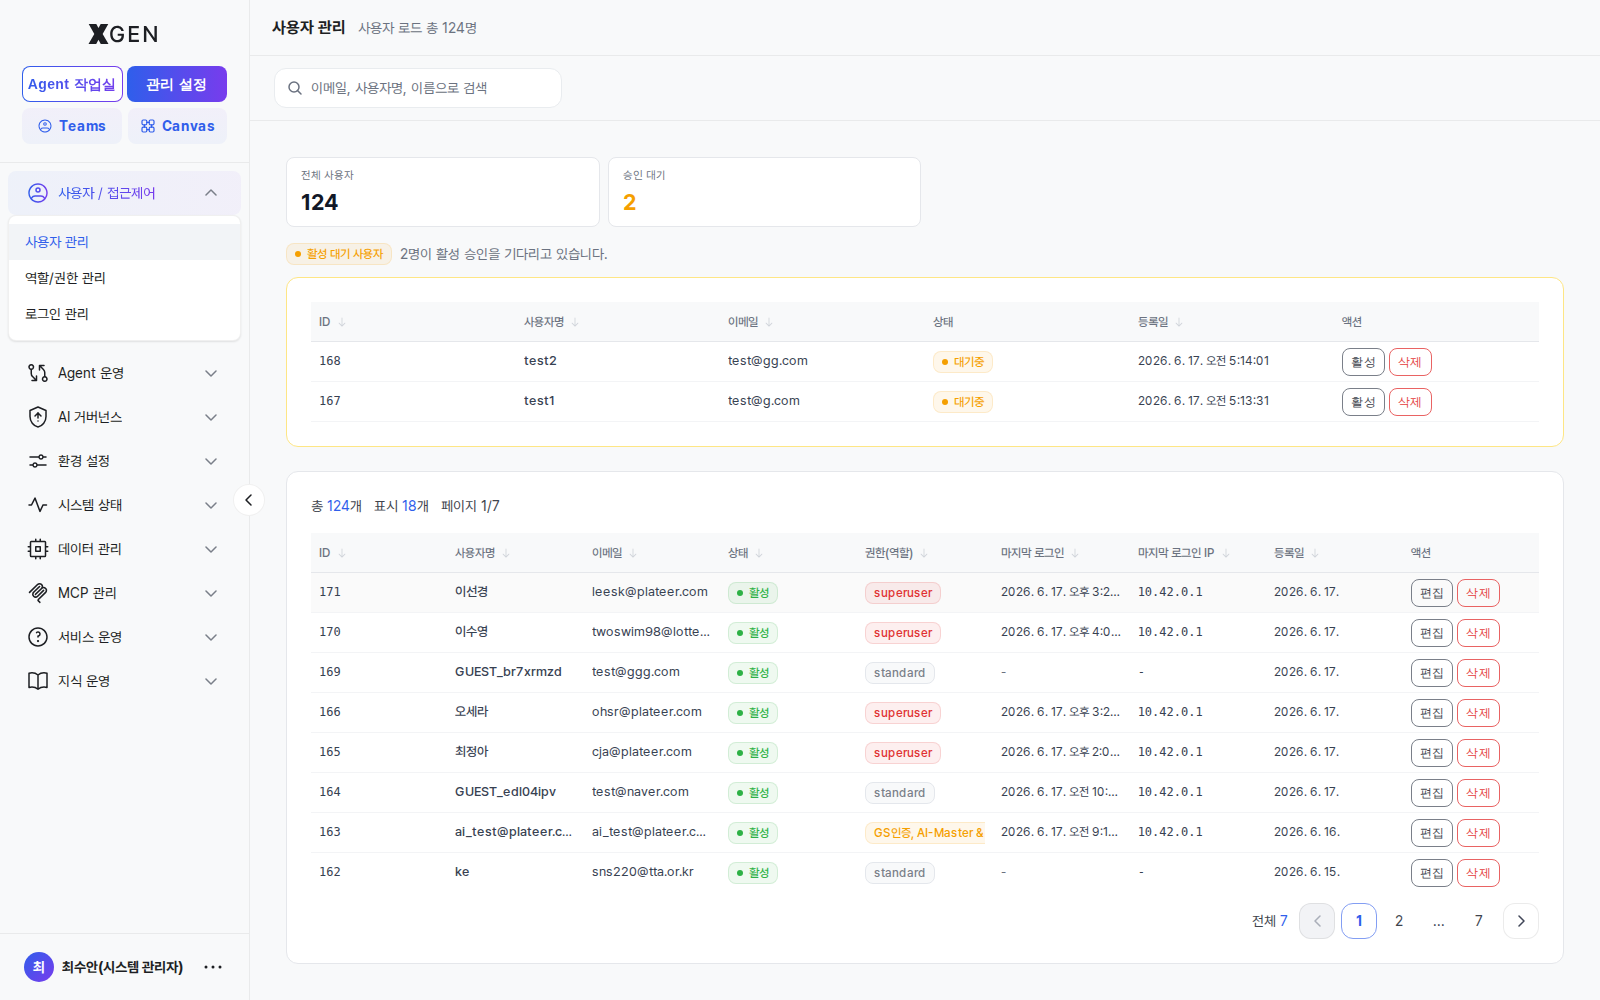
The screen has four areas:
| Area | Contents |
|---|---|
| Top stats | Total Users count and Pending Approval count |
| Search box | Filter users by email, username, or display name |
| Pending Approval Users queue | New applicants from self-signup — handle each row with the Activate / Delete buttons |
| Full user table | Every account — each row has Edit / Delete action buttons |
Columns in the full user table (headers are clickable to toggle sort):
| Column | Description |
|---|---|
| ID | Internal system identifier |
| Username | Login ID (the English ID or display name the user entered during signup) |
| Address for notifications and password reset | |
| Status | Active / Inactive / Pending |
| Permission (Role) | superuser / standard tier classification plus assigned role labels (e.g., System Administrator(DJ), Agent Developer(DJ)) |
| Last Login | Most recent access time |
| Last Login IP | Source IP |
| Registered | Signup or creation time |
| Actions | Edit / Delete buttons |
Methods for Adding New Users
New user accounts can be added in two ways depending on your organization's operational policy:
- Self-signup + administrator approval
- Single Sign-On (SSO) integration with corporate identity
This section describes the user registration and approval procedure for the self-signup configuration.
Adding a New User — Self-Signup + Administrator Approval
The new user submits a signup application on the public signup page, after which the account enters the Pending Approval state. A SuperUser — or an administrator with user-management permission — must then approve the account before the user can log in.
Step 1 — User Signup
The applicant signs up directly using the following steps.
- On the login page (
https://<domain>/login), select the Sign up link at the bottom. - On the signup page (
/signup), fill in the following:- Password
- Display name
- Submit the signup application.
After signup the account stays in the Pending Approval state and cannot log in until an administrator approves it.
Step 2 — Administrator Approval
The SuperUser or an administrator with user-management permission reviews pending signups and activates accounts from the User Management screen.
Approval flow
- Open Admin Center → Users / Access Control → User Management.
- Check the Pending Approval counter on the top statistic cards.
-
In the Pending Approval Users list, review the applicant's details.
Visible fields:
- ID
- Username
- Status (Pending)
- Registered date
-
After reviewing the applicant's information, take one of the following actions.
- Activate
- Click the Activate button
- Account status changes to Active
- The user can log in immediately
- Delete
- Click the Delete button
- The signup application is removed
- The user must re-submit the signup form to retry
- Activate
Notes
- Whether self-signup is enabled depends on your organization's operational policy.
- In SSO environments, users may be authenticated automatically via the corporate identity provider without a separate signup form.
- Approval actions and account-state changes may be recorded in the Audit Log.
SuperUser privileges required
Approving / rejecting pending accounts, changing permission tiers, and resetting passwords all require SuperUser — or an equivalent user-management permission. Standard Users do not see this screen at all.
Password Reset
An administrator can directly reset another user's password.
- Click Edit on the target user in the user list
- Expand the Change Password section at the bottom of the modal
- Enter a new password → Save
Recommended: Deliver the new password through a separate channel and instruct the user to change it on first login.
Deactivating a User
Use this when blocking a user temporarily without removing them from the system.
- Click Edit on the target user
- Change status to Inactive
- Save
Inactive users cannot log in, but their agentflows, collections, and chat history are preserved as-is.
Delete vs. Deactivate
Prefer Deactivate whenever possible. Delete permanently removes user data and cannot be undone. For departures or transfers, deactivation is appropriate.
Permission Tier Changes
There are two permission tiers. Toggle them through the User Type select in the user-edit modal (Standard ↔ Superuser).
| Direction | Required Privilege |
|---|---|
| Standard User → SuperUser (promote) | SuperUser |
| SuperUser → Standard User (demote) | SuperUser |
All permission tier changes are recorded in the audit log. If you are the last remaining SuperUser, demoting yourself will leave the system with no one able to access the Admin Center — confirm at least one other SuperUser exists before demoting.
Grant SuperUser only to a minimal number of people
A SuperUser account holds the highest-level privileges, able to perform every administrative function including agent deployment approval. For security and operational control, grant SuperUser only to a limited number of people within the organization (1–2 recommended).
Operate all other users as the Standard type, and selectively grant only the menu and feature permissions they need for their work — a separation-of-privilege principle we recommend. For how to grant permissions selectively, see Roles & Permissions.
Operational Recommendations
- Unify password policy — Apply organizational password policy when adding users. Manage minimum length, complexity, and rotation period from system settings.
- Clean up dormant accounts — Review accounts whose last login is older than 90 days for deactivation each quarter.
- Forbid shared accounts — Multiple people using one account makes audit log tracking meaningless. Enforce one-person-one-account.
Contact
For questions about user management, please contact the Xgen Solution Administrator.