Role / Permission Management
This chapter covers procedures for defining and assigning roles and permissions.
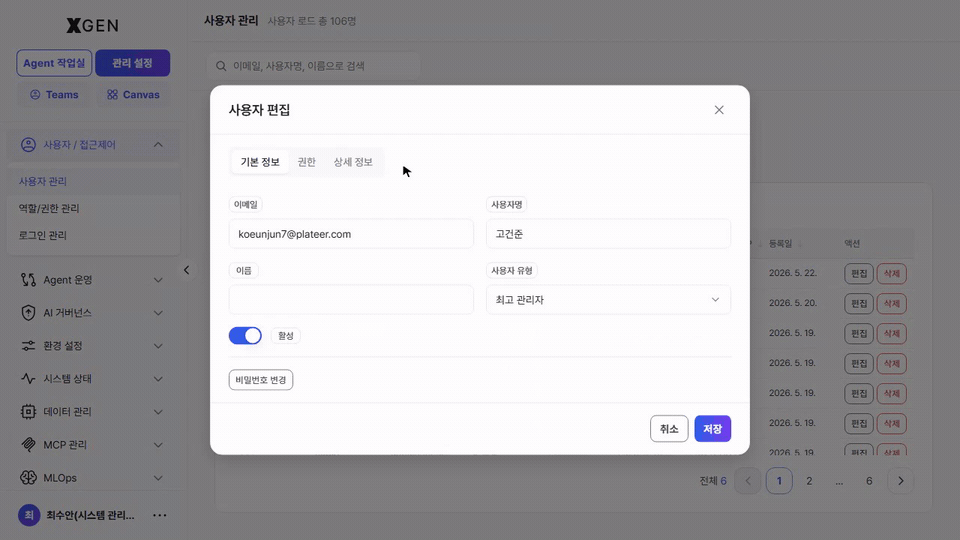
SuperUser — an administrator account that can enter the top-left Admin Center mode. The sidebar menu scope (System Administrator, Governance Officer, etc.) varies by the role assigned. SuperUser is granted in User Management by setting User Type to
Superuserin the user-edit modal.
Permission Model — Two Layers
XGEN's permission model has two layers — Role / Permission.
| Layer | Question it answers | Shape of the value | Defined by | Examples | Where it bites |
|---|---|---|---|---|---|
| Role | Which admin menus does this user see? | Multi-label array | Your organization | System Administrator, Governance Officer, Analyst, Operator | Menu scope shown in the sidebar |
| Permission | Can this user use each section / tab / button inside a screen? | ABAC key array | Permission catalog → mapped to a role or to a user | admin.user:read, main.agentflow:manage |
Section / tab / button-level gates inside a screen |
Permissions are bundled into roles or granted directly to individual users. The recommended pattern is to bundle by role first, then reinforce only edge cases with direct grants.
How Permissions Are Checked
The menus and buttons a user can see are controlled automatically by the system based on the user's permissions. The check proceeds in the order below.
1. Check whether the user is an administrator (SuperUser)
The system first checks whether the account is a SuperUser. SuperUser accounts have access to every administrative function by default.
Note that menu access for System Administrators and Governance Officers may be partially separated according to internal operational policy.
2. Check the user's permissions
If the user is not a SuperUser, the system determines accessible menus based on the permissions that apply to that user. The applied set is the union of the permissions granted directly to the user and the permissions bundled into the roles the user belongs to. As a result, if either side — a direct grant or a role — carries the access permission for a menu, that menu is shown.
For example, even if the User Management access permission (admin.user:read) is not granted to the user directly, the User Management menu still appears as long as one of the user's roles holds that permission. The reverse also holds: a permission received only as a direct grant (not via any role) shows the menu just the same.
Examples:
- Has User Management permission → User Management menu is shown
- Has Agent Creation permission → Agent Creation menu is shown
- Has Knowledge Management permission → Knowledge Management menu is shown
Granted as a union — except for an explicit Deny
Access to menus and features is granted as the union of direct permissions and role permissions described above. However, if a specific permission is explicitly denied in the Direct Permissions area of User Management, the deny takes precedence over the same permission received via a role, and the feature is hidden. Use this to block a permission temporarily for a single user.
3. Features without permission are hidden automatically
Menus and buttons for which the user lacks the required permission are not shown. Users only see the features available to them; everything else is hidden silently.
Three Ways to Grant Permissions
An administrator (SuperUser) can grant permissions to a user through the three paths below (multi-select and combinations allowed).
| # | How permissions are granted | Where to do it | Typical use |
|---|---|---|---|
| 1 | Role + permissions bound to the role | This chapter → Role tab → Create Role → Permissions button | An "Analyst" role bundling main.knowledge:read and similar |
| 2 | Role-to-role inheritance (Supervision) | This chapter → Permission Hierarchy tab → add a relation | "Team Lead ← Team Member" so the lead inherits all member permissions |
| 3 | Direct grant to an individual user | User Management → user edit → Direct Permissions | Temporarily granting or denying a single permission to one user |
Role Tab
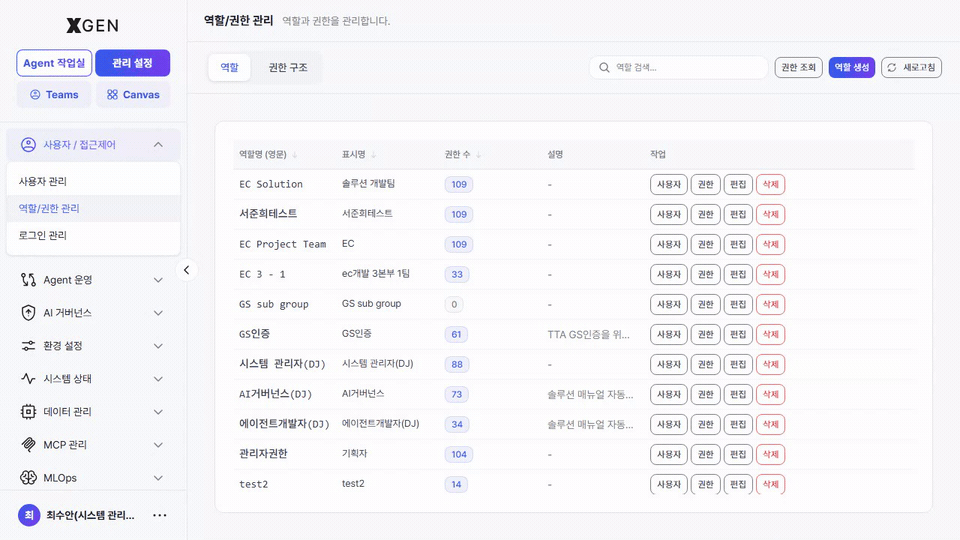
Select Admin Center → Users / Access Control → Role / Permission Management in the left sidebar (view ID admin-role-management). The Role tab opens by default.

Top area — tabs, search, action buttons
| Area | Location | Behavior |
|---|---|---|
| Tab — Role | Top-left (current tab) | Lists registered roles |
| Tab — Permission Hierarchy | Second tab | Manage supervisor / target relationships between roles — Permission Hierarchy tab |
| Search | Top-right input | Search roles... — filter by role name or display name instantly |
| Button — Inspect Permissions | Top-right (white) | Pick one user and expand their composed permissions — Inspect Permissions modal |
| Button — Create Role | Top-right (purple) | Open the create-role modal — Creating a Role |
| Button — Refresh | Top-right (gray) | Reload the list immediately |
Role table — columns and per-row action buttons
Column headers with a ↓ icon are clickable to toggle the sort direction.
| Column | Description |
|---|---|
| Role name (English) | System identifier — kebab-case recommended (e.g., analyst, content-manager). This becomes a DB key and is preserved permanently; avoid renaming after creation. |
| Display name | Korean or screen-facing name (e.g., 분석가, 콘텐츠 관리자) |
| Permission count | Number of permissions bound to this role — 0 means no permissions are bound yet |
| Description | One-line description (- if empty) |
| Actions | Four buttons per row — Users / Permissions / Edit / Delete (see below) |
Each action button opens a dedicated modal.
| Button | What it opens |
|---|---|
| Users | The assigned-users modal — currently assigned users appear as chips at the top (click × to remove), and the lower list lets you filter and + Add more users in bulk — Assigned Users modal |
| Permissions | The permission-checklist modal grouped under two scopes (ADMIN / MAIN) — Permission Settings modal |
| Edit | Edit role name (English) / display name / description. Avoid renaming the role identifier after creation since it is a system key. |
| Delete | Red button. Attempts immediate deletion; blocked with a warning if any user is still assigned to this role. |
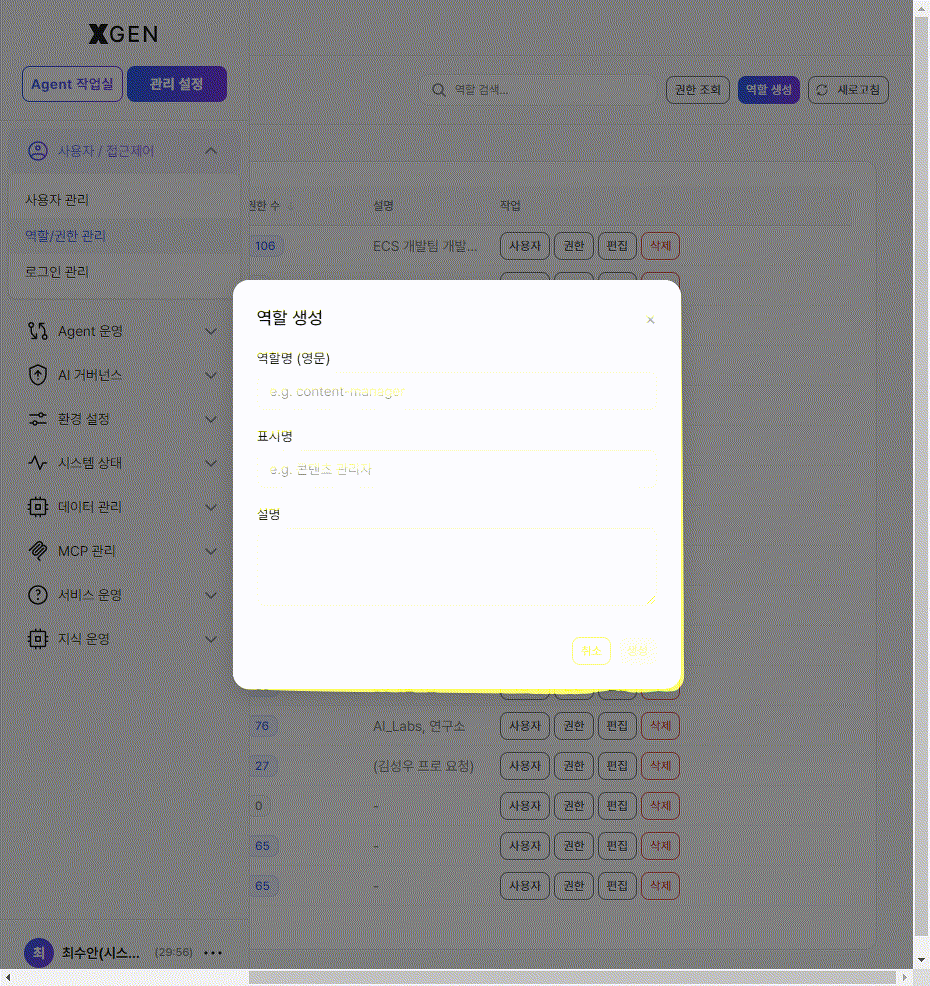
Creating a Role
Role creation is a two-step process — register the role first, then click the Permissions button on the role row to grant the permission checklist.
Step 1 — Register the role
- Click Create Role at the top right of the role list
- Fill in the modal:
- Role name (English) — e.g.,
content-manager(must be unique) - Display name — e.g.,
콘텐츠 관리자 - Description — (optional)
- Role name (English) — e.g.,
- Once all required fields are filled, the Create button at the bottom right activates. Clicking it registers the role with 0 permissions.
Step 2 — Grant permissions
To grant permissions, click the Permissions button on the role row. The Permission Settings modal opens, showing two scopes (ADMIN / MAIN) with permissions grouped by category.
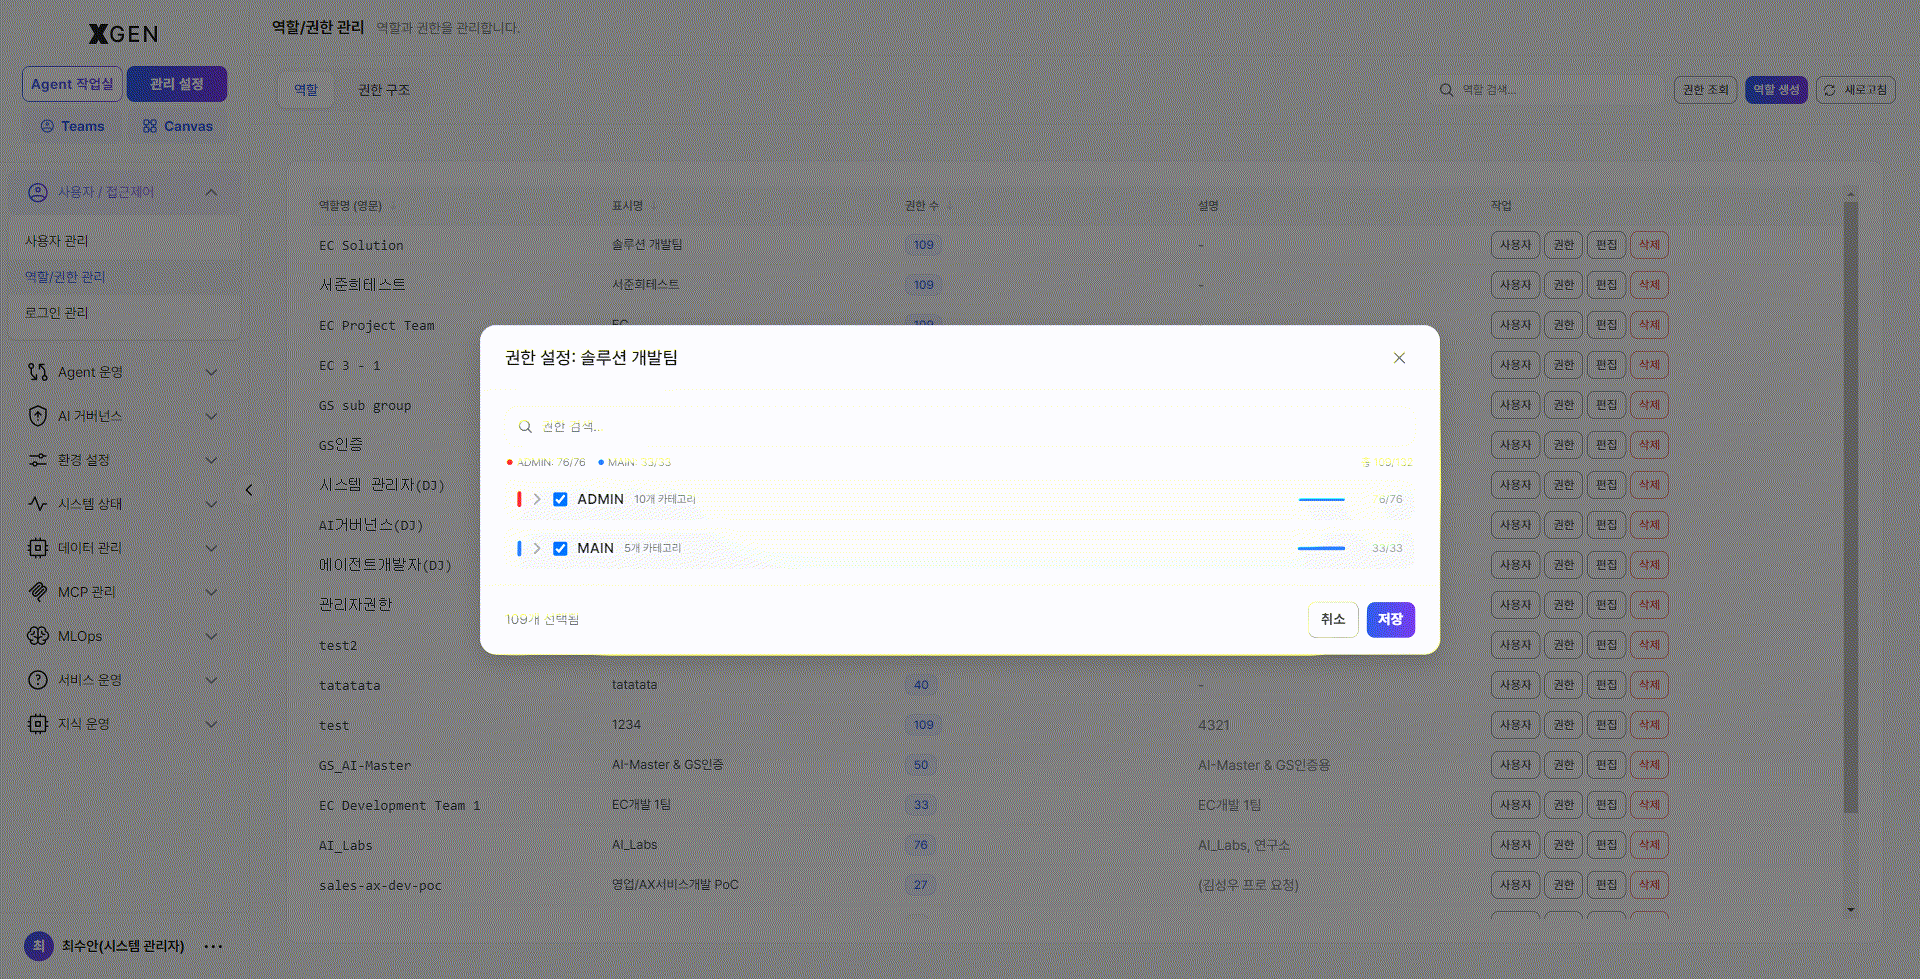
Layout:
- Header —
Permission Settings: <display name>so you can see which role you are editing. - Search input — instant keyword filter.
- Scope count badges — e.g.,
● ADMIN: 76/76,● MAIN: 33/33(selected / total per scope) plus an overall sum (e.g.,Total 109/132). - Checkbox tree — expand each scope with the
▶chevron and check individual permissions, or check the category checkbox to toggle select all / clear all within that category. - Selection footer — bottom-left shows the live count (e.g.,
109 selected). - Buttons — bottom-right Cancel / Save. Permissions are only applied to the role when you click Save.
After saving, the role list's Permission count column reflects the new total.
Assigning users — after granting permissions
Once a role has permissions, use the Users button on its row to bulk-assign users.
Layout:
- Top — Assigned Users: users currently holding this role appear as chips. Click × on a chip to revoke immediately.
- Bottom — Available Users: filter via the search box, then click + Add next to each user to move them up into the chip area. Multiple additions allowed.
- Save / Close — changes apply instantly; Close dismisses the modal.
Assigning Multiple Roles to a User
The Users button on the Role screen is best for assigning the same role to many users in bulk.
When you need to grant multiple roles to a single user, set them via the User Edit modal on the User Management screen instead.
Example:
- User Management > User Edit > Permissions tab
- Multi-select roles and Save
This path is more efficient when you organize permissions around the user rather than around the role.
Common scenarios
Case 1 — A new job function needs its own role (example: "Compliance Officer")
- Role tab → Create Role
- Modal fields: role name
compliance-officer/ display name컴플라이언스 담당/ description "AI usage risk review and routine audit-log inspection" - Permissions button on the row → check
admin.governance:*+admin.audit:read+admin.user:read→ save - Users button on the row → multi-select compliance team members → bulk assign
Case 2 — Team-level permission bundle (example: "EC Development Team")
- On the Role tab, click Permissions on the existing EC Development Team 1 row to inspect the bundle
- When a new team member joins, click Users on the same row and add them — permissions follow automatically
- When the team takes on a new responsibility, check the new permission via the Permissions button — it applies to the whole team instantly
Case 3 — One-off temporary permission (for a single user only)
- Do this in the user-edit modal in User Management, under the Direct Permissions section — Grant or Deny
- Creating a role for a temporary permission affects other users too; Direct Permissions is safer for a single-user scope
Permission Hierarchy Tab — Supervisor / Target
In complex organizations you can define supervisor / target relationships between roles so that a supervisor role inherits its target role's permissions automatically.
- Supervisor Role: holds the larger permission set
- Target Role: holds the smaller permission set
Example: if a "Team Lead" role supervises a "Team Member" role, the lead receives team-member permissions + team-lead-specific permissions. Any later change to team-member permissions propagates to the lead automatically.
Screen layout
Click the Permission Hierarchy tab at the top. Existing relations are listed as table rows.
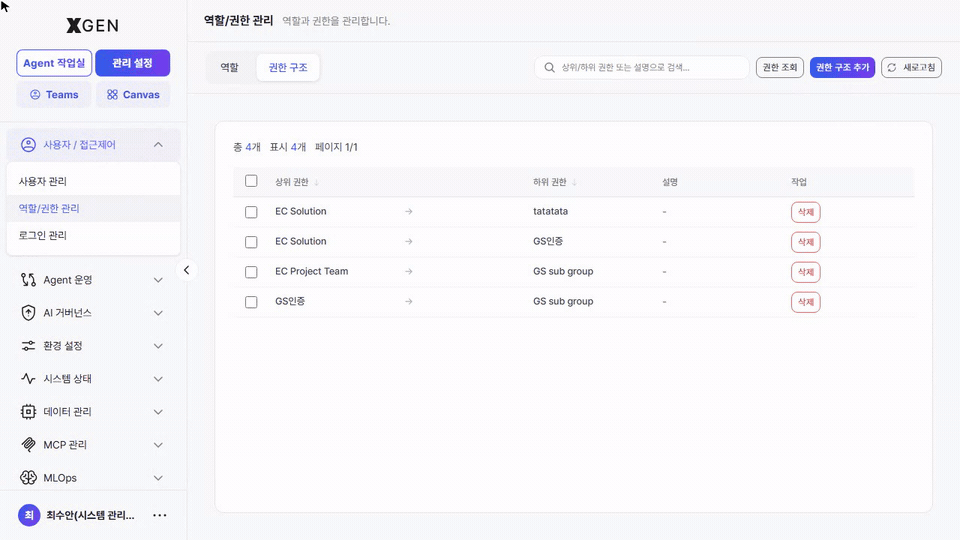
| Area | Description |
|---|---|
| Top counters | Left side shows Total N, Showing N, Page 1/N — total relations and current page |
| Search | Search supervisor / target / description... — filter rows instantly |
| Button — Inspect Permissions | Same modal as on the Role tab — see Inspect Permissions modal |
| Button — Add Hierarchy | Purple. Open the create-relation modal — 1 supervisor + N targets + optional description |
| Button — Refresh | Reload the list immediately |
Table columns:
| Column | Description |
|---|---|
| Checkbox | Multi-select — reserved for future bulk operations such as bulk delete |
| Supervisor ↓ | The role with the larger permission set (English identifier) |
| Target ↓ | The role that inherits its permissions (English identifier). If one supervisor has multiple targets, each pair appears as a separate row. |
| Description | What the relation means (- if empty) |
| Actions | Row-end Delete (red outline) — removes this supervisor / target relation immediately |
Workflow — adding a relation
- Click Add Hierarchy at the top right of the Permission Hierarchy tab.
- Fill in the modal:
- Supervisor — pick the larger-permission role (dropdown).
- Target — pick the role(s) being inherited (multi-select).
- Description — optional.
- Click Save. A new row appears in the list immediately.
Users assigned to the supervisor role hold the inherited permissions immediately — no re-login required (the sidebar refreshes on the next navigation).
Workflow — removing a relation
Click the row-end Delete button to remove that supervisor / target relation. The supervisor and target roles themselves are not deleted; only the inheritance link is broken. From that moment, supervisor users no longer inherit the target's permissions.
Inspect Permissions — View the Final Effective Permissions for a User
The Inspect Permissions button at the top right of either the Role or Permission Hierarchy tab shows the final permissions a single user holds after combining roles, supervision inheritance, and direct grants. It is essential when answering "why isn't this menu visible?" or "are we accidentally exposing broad permissions?"
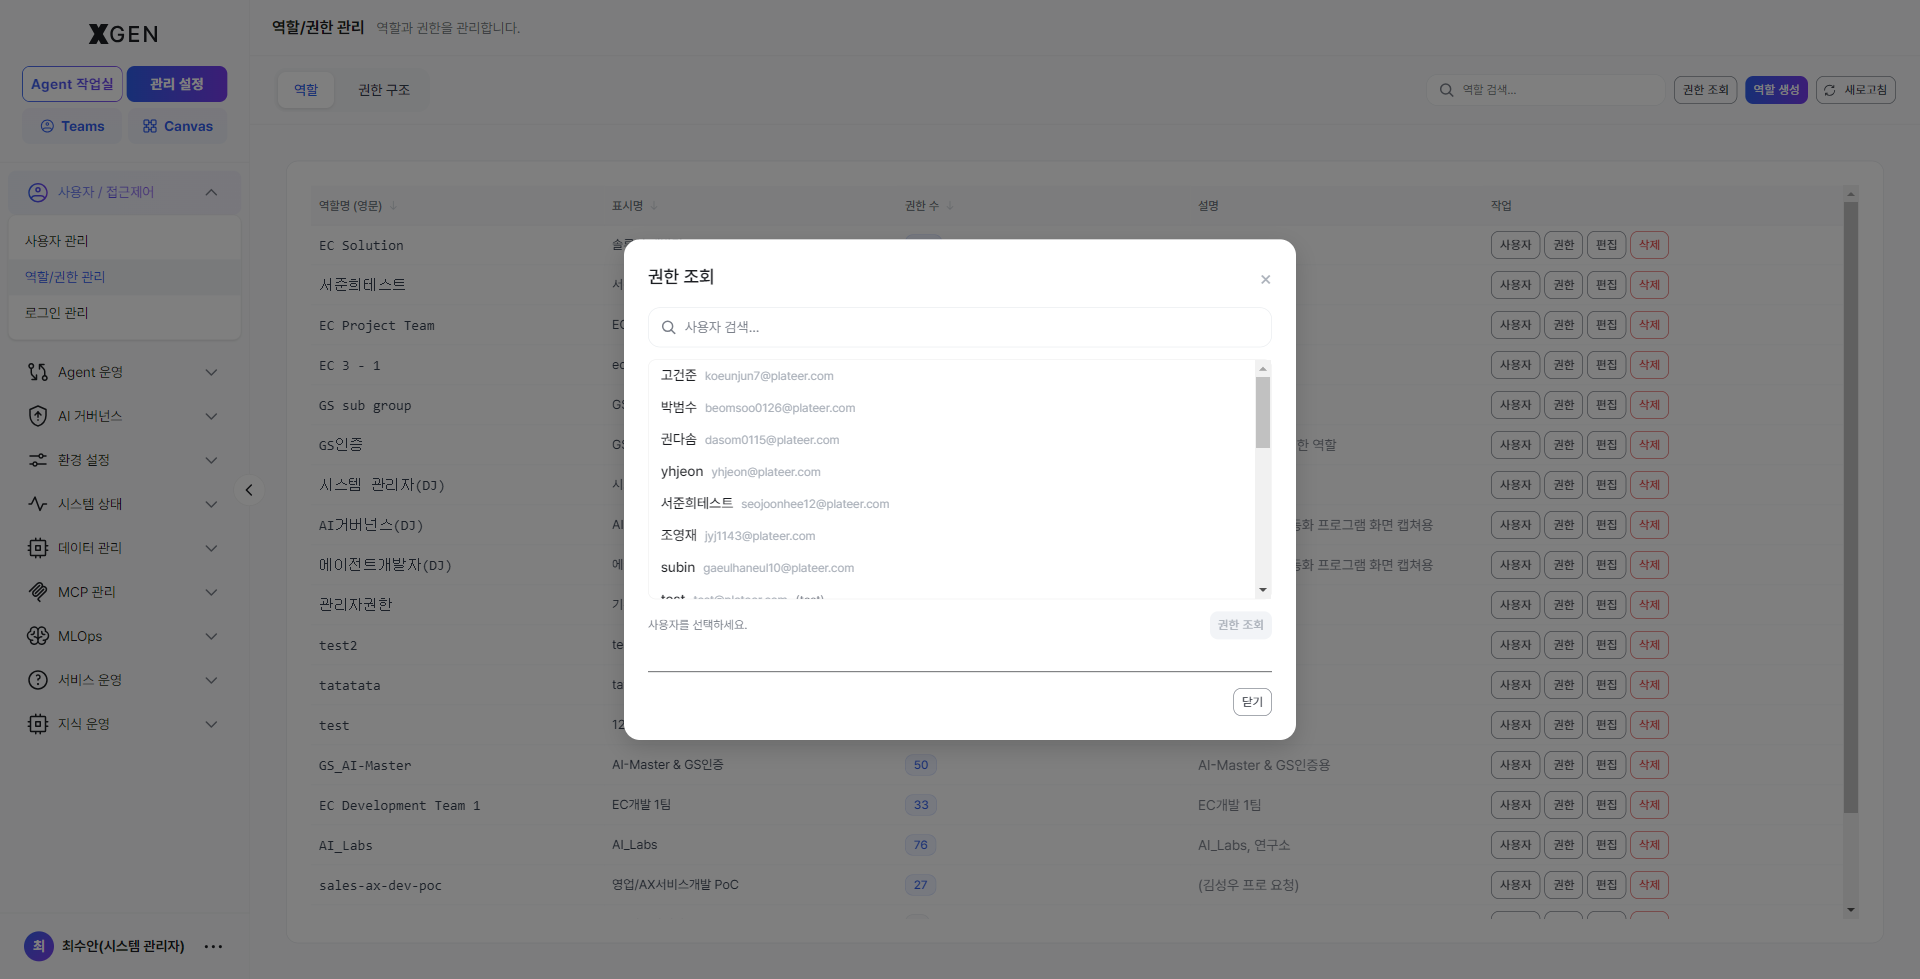
Layout:
- User search — type part of an email, name, or username.
- Pick a user from the matching list.
- Click Inspect Permissions at the bottom to expand the composed permission view.
If the Inspect Permissions button is missing
Inspect Permissions is exposed only to SuperUsers who hold admin.permission:*. Confirm whether this permission is in your role by clicking the Permissions button on your own row in the role list.
Assigning Roles to Users
Option A — From the role screen (one role → many users)
- Click the Users button on the target role row → the Assigned Users modal opens.
- Filter and select users in the lower Available Users list, then click + Add — multi-select allowed.
- Changes apply instantly; Close the modal when done.
Option B — From the user screen (one user → many roles)
- User Management → open the user-edit modal → switch to the Permissions tab.
- Multi-select the desired roles in the Roles area.
- Click Save.
Revoking Permissions
| Action | Procedure |
|---|---|
| Remove a user from a role | Role detail → Assigned Users → click × Remove next to the user |
| Delete the role itself | Click Delete in the role list — blocked if any user is still assigned to this role |
Check before deleting a role
Confirm the assigned user count before deletion. If it is not zero, revoke the role from those users first.
Operational Recommendations
Role naming (creation)
- English identifier (
name) — kebab-case (e.g.,content-manager). It becomes a DB key and is preserved permanently, so consistency matters. - Display name (
display_name) — align with your organization's job-title / department naming so user management and audits are intuitive. - Description — keep it to one line. "What does this role do?" is decisive for handover and search.
Granting permissions (role operations)
- Least-privilege principle — start narrow, add as needed. Broad permissions (e.g.,
*:*) should only ever be granted to SuperUsers. - Group temporary permissions into a separate role — collect volatile temporary permissions into a temporary role so that you can revoke them in one go. Direct Permissions on a user is for single-user cases only.
- Direct Deny is for exceptions — use only when a user must be blocked from a permission they would otherwise receive via a role. Frequent use makes permission flow untraceable.
Periodic review (quarterly recommended)
- Roles with 0 assigned users — decide whether they are intentional containers or cleanup leftovers; delete or annotate accordingly.
- Roles with 0 permissions — same review.
- Supervision graph — remove unnecessary inheritance relationships. If the depth exceeds 3, consider whether direct permission grants would be simpler.
Common Issues
| Symptom | Cause / what to check |
|---|---|
| "I have the permission but the sidebar menu doesn't appear" | Sidebar visibility is decided by permission prefix matching. Example: holding only admin.user:read shows the User Management sidebar but not AI Governance. |
| "The role is assigned but the menu doesn't open" | The user may need to re-login or refresh the token. Or it may be a menu that requires SuperUser privilege (e.g., the entire Admin Center mode) — change User Type to Superuser in User Management. |
| "Role delete says 'X users are assigned and it cannot be deleted'" | This is the intended safety check. Click the Users button on the row, reduce the assigned count to 0, and try again. |
| "I want to temporarily turn off a permission for one user only" | Go to User Management → edit → Direct Permissions and set the permission to Deny. When role → grant and direct → deny both exist, deny wins. |
| "The Inspect Permissions button is not visible" | Inspect Permissions is exposed only to SuperUsers who hold admin.permission:*. Verify whether this permission is included in your role. |
Contact
For role / permission inquiries, contact the Xgen Solution Administrator.